This baby bonnet pattern is part of my baby set and is suitable for intermediate beginners. For this pattern you will need –
4mm Crochet Hook
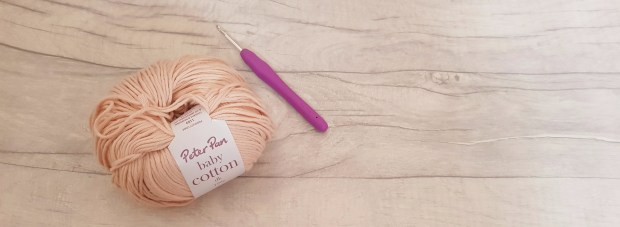
DK Cotton Yarn (I used Peter Pan Baby Cotton)
Find the video here, the written pattern is below –
This pattern in written in UK Terms
Abbreviations
st/sts – Stitches
ch – chain
dc – double crochet
htc – half treble crochet
tc – treble crochet
ss – slip stitch
Start by making a magic circle or ch 4 and ss into the 1st ch
Round 1 – ch 1, work 10 tc into the magic circle, ss to join (10 st).
Round 2 – ch1, work 2tc into each stitch, ss to join (20 st).
Round 3 – ch1, work 2tc into the first st and 1 tc into the next. Repeat until the end. Ss to join (30 st).
Round 4 – ch1, work 2tc into the first st and 1 tc into the next 2 st. Repeat until the end. Ss to join (40 st).
Round 5 – ch1, work 2tc into the first st and 1 tc into the next 3 st. Repeat until the end. Ss to join (50 st).
Round 6 – ch1, work 1 tc into each st (50st).
Round 7 – ch1, 1htc, *skip 2 st, work 2tc, ch3, ss all into the same stitch*. Repeat *to* 16 times. 1htc into the last st. Turn (50 st)
Round 8 – ch1, 1htc, * work 2tc around the ch3 from the previous round, ch3, ss into the 3rd ch from the previous*. Repeat *to* 16 times. 1htc into the last st. Turn (50 st)
Round 9 – 17 – Repeat round 8. Fasten off and secure your yarn.
Strap
Chain 42 then join with a slip stitch to the main part of the bonnet. Work dc’s evenly around the bottom edge of the bonnet. When you reach the opposite edge, ch42, turn, work 1dc into each chain, along the bottom edge of the bonnet and into each of the 42 chains on the opposite side. Fasten off and sew in all your ends.
Congratulations, you have made yourself a baby bonnet!
Have you ever struggled to attach new yarn or wondered how to change colours?? Well have no fear, the magic knot is here to help you! It is so easy and simple and you will be changing colours in no time! Have a watch of the video below to see how its done!
I love to see your makes so don’t forget to tag me on Instagram – @Lexie_Loves_Stitching
One of the most frequently asked questions that I get from brand new crocheters is “What sort of equipment do I need to start my crochet adventure?”. Well, in this post I am going to talk you through the few (and inexpensive) things you will need to get going. I will warn you though, you will soon have the biggest yarn stash ever and WILL become a crochet addict! I love crochet. It is my favourite thing to do. Crochet has helped me get through bad days, has given me the opportunity to make new friends and even makes me feel valued when I get lovely compliments about my work. So what are you waiting for?! Pick up that hook and yarn and join the best community that I have ever had the privilege of being part of!
Firstly, hooks! You do not need to buy yourself a super duper expensive hook. I started out with a simple 4mm aluminium hook.. These hooks are brilliant for beginners as they are cheap and widely available. If you have any issues with grip, such as arthritis I would highly recommend a silicone handled hook such as the Clover 4 mm Amour Crochet Hook. These are my favourite hooks in the whole world and are defiantly worth spending that little bit extra on. 4mm is the size that I would recommend starting out with. It is the hook size that I use the most and is the size recommended for most Double Knit (or DK) yarns.
4mm Clover Amour Hook
4mm Pony Aluminium Hook
Now for the yarn! Trust me when I say DO NOT start off with a dark coloured yarn such as black or navy. Dark colours are really hard to work with and you will end up seriously frustrated which is not what you want when you are first starting out. I suggest a light colour in Double Knit (or DK). I absolutely love the Robin Yarns from Thomas Ramsden. They are affordable and come in a huge variety of colours. My favourites for a beginner would be their Madonna or Spearmint. Both of these are DK yarns.
Madonna Robin DK Yarn
Spearmint Robin DK Yarn
Stitch markers are also a great accessory for a beginner as they can help you to keep the edges of your work straight. I use Clover Locking Stitch Markers. These are defiantly the best stitch markers and will be your best friend for straight edges!
Clover Locking Stitch Markers
If you are still feeling a bit overwhelmed by all this information, you can find my YouTube guide here to help you even more.
Please feel free to contact me via the contact page if you have any questions.
Happy Crocheting!
This week I am going to teach you how to crochet a simple jumper for a baby. This pattern is really simple and only uses treble crochet. The size that is in this pattern is for a 6 to 12 month old baby (size 12 – 18 months can be found in google docs for free using this link – 12- 18 month pattern). If you would like the pattern in another size, then please contact me and I will send you the pattern. I have also done a YouTube video for this pattern so if you are not a confident pattern reader then I have popped the link to the video at the bottom of the page.
For this pattern you will need –
A 4mm Crochet Hook
DK (Double knit) Yarn, I have used Robin DK Shade Pale Rose (111)
Scissors
Darning Needle (for those pesky ends!)
Tape measure
A cup of tea and lots cake to keep you going
This pattern is written in UK Terms
Abbreviations:
Approx = Approximate(ly)
Beg = Begin(ning)
Ch = Chain(s)
Rem = Remain(ing)
RS = Right Side
WS = Wrong Side
Sl st = Slip stitch
Sp(s) = Space(s)
St(s) = Stitch(es)
Tc = Treble crochet
Tc2tog = Treble crochet 2 together
Tcbp = Treble crochet back post
Tcfp = Treble crochet front post
Rep = Repeat
Rnd(s) = Round(s)
Note: This jumper is worked in one piece from neck edge down.
A chain 2 or 3 at the beginning of a round counts as a stitch.
Start your jumper by chaining 56 stitches. Make sure you chain loosely as this foundation chain will need to pull over baby’s head. Join with slip stitch to first chain, taking care not to twist your chain (Check out my YouTube video for this pattern for a handy hack to stop your chain from twisting).
Round 1: Ch 3. 1 tc in the next 7chains. In the 8thchain, we are going to do a V stitch – 1 tc. Ch 1. 1 tc (all in that same 8thchain). 1 tc in each of next 10 chains. V-st in next ch. 1 tc in each of next 16 ch. V-st in next ch. 1 tc in each of next 10 ch. V-st in next ch. 1 tc in each of last 8 ch. Join with sl st to top of ch 3.
Rounds 2 – 9: Ch 3. *1 tc in each tc to ch-1 sp of next V-st. V-st in ch-1 sp of next V-st. Rep from * 3 times more. 1 tc in each tc to end of rnd. Join. 124 tc and 4 ch-1 sps at end of 9th rnd.
Dividing the Jumper Sleeves and Body:
Round 1: Ch 3. 1 tc in each of next 16 tc. 1 c in ch-1 sp of next V-st. Ch 3 for underarm. Skip next 28 tc. 1 tc in ch-1 sp of next V-st. 1 tc in each of next 34 tc. 1 tc in ch-1 sp of next V-st. Ch 3 for underarm. Skip next 28 tc. 1 c in ch-1 sp of next V-st. 1 tc in each of last 17 tc. Join with sl st to top of ch 3.
Round 2: Ch 3. 1 tc in each tc or ch around. Sl st to top of ch 3. 78 tc.
Round 3: Ch 3 1 tc in each tc around. Join with sl st to top of ch 3.
Round 4: Ch 3. 1 tc in each tc around. Join with sl st to top of ch 3. Rep last rnd until your jumper measures 11 cm from the under arm to the bottom of your jumper.
Ribbing: Ch 2. *tcbp around post of next st. tcfp around post of next st. Rep from * to last st. Tcbp around post of last st. Join with sl st to top of ch 2. Rep last rnd 4 times more. Fasten off at end of last rnd.
Sleeves (Optional):
Round 1: (RS). Join yarn with sl st to centre of underarm ch. Ch 3. 1 tc in each ch or tc around. Join with sl st to top of ch3. 31 tc. Round 2: Ch 3. 1 tc in each tc around. Rep last rnd until the sleeve from underarm chain measures 10 cm. Round 3: Ch 3. 1 tc in each of next 15 tc. Tc2tog. 1 tc in each tc to end of rnd. 30 tc.
Sleeve Ribbing:
Round 1: Ch 2 (counts as first st). *Tcbp around post of next st. Tcfp around post of next st. Rep from * to last st. Tcbp around post of last st. Join with sl st to top of ch 2. Rep last rnd 4 times more. Fasten off at end of last rnd.
Congratulations! You have finished your jumper. For a nice touch to finish off your jumper, how about going around the neck line and the bottom of your jumper in a contrasting colour? Just attach your yarn, chain 2, then double crochet into each stitch around and when you reach the starting chain 2, simply join into this with a slip stitch.
Sorry that it has been so long since my last blog post. I have been really busy on placement and also I have some not so good news. A few weeks ago I found a lump on my breast. I made an appointment to see my GP who then sent me to Breast Clinic at hospital. I saw a lovely consultant who assured me that he was sure the lump was 99.9% “nothing” but thought he would do a biopsy to be sure. Anyway, long story short, I am booked in to have surgery on Friday April 13th (what a date!) to have the tumour removed. It was a huge shock BUT I CAN AND WILL get through this. Some days I do feel really angry and ask why me but I know that there are people in this world that are going through things that are a gazillion times worse that what I am going through. I have the most amazing bunch of friends and family and I am in no way a quitter.
In happier news (!), I have been busy with my crochet hook and sewing machine! I completed a beautiful cardigan from the book Geek Chic Crochet by Nicki Trench using Wendy 4 ply in a beautiful Mint Colour. I also made a cute toddler kitty jumper and up cycled a pair of old jeans that were destined for the bin into a little girls pinafore!
Don’t forget that you can also find my crochet tutorials on You Tube. Why not check out my waffle stitch video here
Here in the UK we have been hit by Storm Emma which has involved lots of snow, freezing temperatures and most of the country coming to an absolute standstill with snow days for all. To keep the cabin fever at bay (I’m such a doer, that if i’m stuck at home for more than an hour I go slightly crazy), I designed this super easy 30 minute head band/ ear warmer. It really is suitable for beginners as it is only uses chain stitch and Treble Crochet (US Double). I have done a YouTube tutorial to make it easy to follow.
Are you new to crochet or have not had the confidence to try a granny square yet? Well with my super simple and easy YouTube Tutorials you can now give it a go! I have also included a bonus video on how to join your Granny squares so you can make yourself a lovely blanket!
To purchase any of the Robin DK yarns you see in my video, click on this link – https://www.lovecrochet.com/robin-yarns-and-threads?a_aid=efe2a487
I would love to see all of your creations so don’t be scared to get in touch!
The winner of my last giveaway did not come forward so I have started a new giveaway draw. I am so desperate to pass on some Crochet pixie dust!! To enter to win some BEAUTIFUL yarn from Thomas Ramsden just have a watch of my YouTube video that you can find below. The draw is open WORLDWIDE so where ever you are, feel free to enter and good luck! I will announce the winner on Tuesday 20th Feb 2018. If you wish to purchase any of the Robin yarn seen in my video, you can find it on Love Crochet here – https://www.lovecrochet.com/robin-yarns-and-threads?a_aid=efe2a487
Don’t forget to like and subscribe to my YouTube channel to see new crochet lessons every Sunday.