Super Easy Cowl/Infinity Scarf

20171022_201449.jpg

Hello Everyone!!

Welcome to my Super Easy Cowl/Infinity Scarf tutorial!  This is the most easiest pattern ever and can easily be worked up in an afternoon.  Lets grab a cup of tea and get crocheting!


For this project, you will need – 

  • 2 100g balls of Robin Chunky (I used shade 111)
  • 5.5mm Crochet Hook


20171022_151828.jpg


To Begin – Chain 24

20171022_152029.jpg


Round 1 – Treble crochet (tc) into fourth round from the hook and continue to tc into each stitch until you reach the end.

Round 2 – Chain 3 and turn your work. Tc into the same stitch as your chain 3, skip 2 stitches then 3tc into the next stitch.  Continue working the skip 2 stitches, 3tc into the next stitch until you have 3 stitches left.  Skip 2 stitches then 2tc into the final stitch.  (22 Stitches)

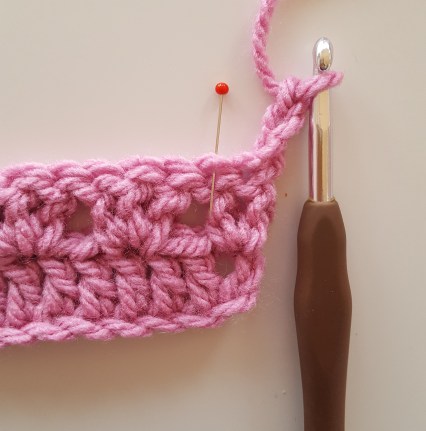
Round 3 – Chain 3 and turn your work. 1tc into each stitch along.  Be careful not to tc into the stitch that has your chain 3 in it.  You want to tc in the stitch indicated below.  (22 Stitches)

20171022_153132.jpg


Round 4 –  Chain 3 and turn your work. Tc into the same stitch as your chain 3, skip 2 stitches then 3tc into the next stitch.  Continue working the skip 2 stitches, 3tc into the next stitch until you have 3 stitches left.  Skip 2 stitches then 2tc into the final stitch.  (22 Stitches)


20171022_153755.jpg

Round 5 – Chain 3 and turn your work. Tc into the same stitch as your chain 3, skip 2 stitches then 3tc into the next stitch.  Continue working the skip 2 stitches, 3tc into the next stitch until you have 3 stitches left.  Skip 2 stitches then 2tc into the final stitch. (22 Stitches)

Round 6 Onwards – Keep  repeating rounds 4 and 5 until your scarf reaches the desired length (I like it so it can wrap around me twice, but I can still breath ha ha!).  Make sure that you end on a round 5 round.  To join your scarf together simple, place the 2 ends together on top of each other and slip stitch together.

TA DA!!!!! You have finished your scarf!!!!

Thanks to the gorgeous Megan Daisy for being my model!  Let me know how you get on with your make and feel free to message me if you have any issues with the pattern.

Take care and lots of crochet love

Screen Shot 2017-10-17 at 16.08.44

Advertisement

Super Easy Skirt!!

Hi Everyone!

Welcome to my first sewing post!! I have come up with this super easy skirt that is made from jersey fabric.  It is a really simple construction with only 2 seams and an elasticated waist band.  I have even drafted a pattern for you but if you can’t print the pattern, have no fear, I will show you how to draft your own from your body measurements in next weeks blog and it can be drawn straight onto your fabric! It really is that simple. So grab a cup of tea and the following items and lets get going!!

20171017_154149.jpg

For this Super Easy Skirt you will need – 

  • 1 meter of stretch jersey fabric (pre washed to allow for any shrinkage)
  • Matching thread
  • 1 meter 3/4 inch elastic
  • Scissors/Pinking Shears
  • Dressmaking Pins
  • Sewing Machine (with Stretch or Ball Point Needle for Jersey Fabrics)
  • Tape measure 

Firstly, print out your pattern.  You can find it here – Super Easy Skirt  Make sure that when you print your pattern, you check that your printer settings are on Scale 100% otherwise your pattern will print out too small.  DO NOT select any special printing options such as centre to fit page.  Print your pattern pieces in portrait.

Screen Shot 2017-10-17 at 11.58.36

Once you have printed out your pattern, use the grey circle guides on the corners of the sheets to match up the pattern pieces, folding under or cutting off any overlaps, tape or glue them together (I find glue easier. Use a Pritt Stick) and cut out your pieces.

Step 1 – Lay out your fabric right sides together as shown in the picture below with the 2 shorter ends meeting in the middle .  Lay your pattern piece onto your fabric ensuring that the side of the pattern that says “Cut on fold” is matching with the fold of the fabric.  Pin your pattern piece in place and carefully cut out.  Flip your pattern over so that the writing is on the back of the pattern and repeat the cutting out process on the other side of your fabric.


Step 2 – Place your 2 pieces of cut fabric on top of each other, right sides together. Pin the edges to keep them in place for sewing.  Use as many pins as you like.  There is no limit to the amount of pins you can use!!

20171017_153831.jpg


Step 3 – Using a zig zag stitch (I have a Janome and its stitch 3 for zig zag), sew up each side seam from top to bottom using a 1.25cm (1/2 inch) seam allowance.  As we are using jersey there is no need to finish off the raw edges as jersey will not fray.


Step 4 –  Turn up the hem of your skirt by 1.25 cm and press with an iron, then turn up the hem by another 1.25 cm, pin in place and stitch with a straight stitch.

20171017_145130.jpg


Step 5 – Now for the waist band! Take your elastic and pass it around your waist. Adjust it until it feels comfortable and cut it to the length that you want. Mark the centre of your elastic, then mark a quarter way from each end to make 4 even sections. Attach the two ends of your elastic together using a zig-zag stitch on your machine.  Fold your skirt with the side seams together to find the centre point at the front and back or your skirt. On the inside of your skirt, match the join in the elastic with one side seam, match the centre of the elastic with the other side seam and match the quarter marks with the skirt centre front and back. Your elastic may be a little shorter than your skirt fabric but thats ok as it will mean your skirt will fit nice and snug around your waist.


Step 6 – Using a zig zag stitch, sew your elastic to the skirt waist. Stitch close to the edge.  Stretch the elastic slightly as you sew to match up your markings on the elastic to the fabric.

20171017_153257.jpg


Step 7 – Fold sewn in elastic towards the inside of the skirt, pin and stitch using a zig zag stitch.  This will then cover the elastic and make your waist band nice and neat.

20171017_153237.jpg


TA DA!!!!  Your skirt is complete!!!!!


I hope you enjoy wearing your new skirt.  I would love to see your makes.  Feel free to post them on Instagram and use the hashtag #lexiesews.  Feel free to get in contact if you are struggling with any of the steps and I will help as much as I can.

Lots of love!!!!

Screen Shot 2017-10-17 at 16.08.44


Spooky Halloween Crochet Pumpkin!!

imagesHello everyone and welcome to my extra spooky Halloween blog!

Halloween is definitely one of my favourite times of the year.  Cosy nights in under a blanket (crocheted of course), a mug of chai latte and a nice spooky horror film or two.  In fact, sometimes I think that Halloween is better than Christmas!  With the leaves falling off the trees it reminds me of new beginnings and starting again.  So what better a way to celebrate this lovely season than crocheting your very own pumpkin!! This is a simple pattern that it suitable for beginners. Without further ado, grab your hook, yarn (& cup of tea) and lets start crocheting!!

For this pattern you will need –

  • 100g Robin DK Yarn Shade Jaffa (63)
  • 100g Robin DK Yarn Shade Apple (16)
  • 4mm Crochet Hook
  • Toy Stuffing
  • Yarn Needle
  • Stitch Marker (optional) 

20171016_110700.jpg

This pattern uses UK TERMS and instead of a magic circle (yuck ha ha!!) we will use the chain method.  This Pumpkin is crocheted in the round.  You may want to use a stitch marker to place in your first stitch of each round so that you can keep your stitch count accurate.

To begin chain 2

20171016_124623.jpg

Round 1 – 10 Double crochet (dc) into the first chain.

20171016_124943.jpg

Round 2 – 2 double crochet (2dc) into each of the dc from the previous round (20 stitches).

20171016_132008.jpg

Round 3 – dc into each stitch from round 2 (20 stitches)

20171016_132028.jpg

Round 4 – 2dc into each stitch (40 stitches)

20171016_132653.jpg

Round 5 to 8 – dc into each stitch (40 stitches in each round)

20171016_133927.jpg


Round 9 – Double crochet 2 together (dc2tgr) all the way around (20 stitches).  If you are not sure how to do this stitch, find a helpful YouTube video at the end of the pattern.
20171016_134547.jpg

Round 10 –  dc in each stitch (20 stitches).  Start adding some stuffing to your pumpkin.

Round 11 – dc2tgr all the way around (10 stitches). Add some more of the stuffing.

20171016_135208.jpg

Round 12 – dc2tog all the way around (5 stitches) then dc into opposite stitch in order to close the hole. Tie off  your work leaving an extra long tail (40cm or more).

20171016_135354.jpg

Thread your yarn needle to your long end. Insert your needle from the middle of the bottom of the pumpkin to the middle of top. Insert the needle from the middle of the bottom of the pumpkin to the top again and pull tight on the yarn (this will make your indentations) Continue this 8 times making the spaces even. Tie off.

For the leaves:

Using green yarn

To Begin – Chain 2

20171016_140657.jpg

Round 1 – 8dc into first chain of the foundation chain and slip stitch into the first dc of the round to join.

20171016_141358-1.jpg

Round 2: *chain 3, skip a stitch,  slip stitch (ss) into next stitch*  repeat * to * 4 times. Connect and tie off leaving a long end.

20171016_141652.jpg

Sew onto the pumpkin and hide your ends.

Ta Da!!!!! You now have your very own Pumpkin!!  Let me know how you get on with your makes and feel free to share on Instagram, just use the hashtag #lexiespumpkin

For those of you who don’t know how to double crochet 2 together, heres a quick video.


my newhome!