
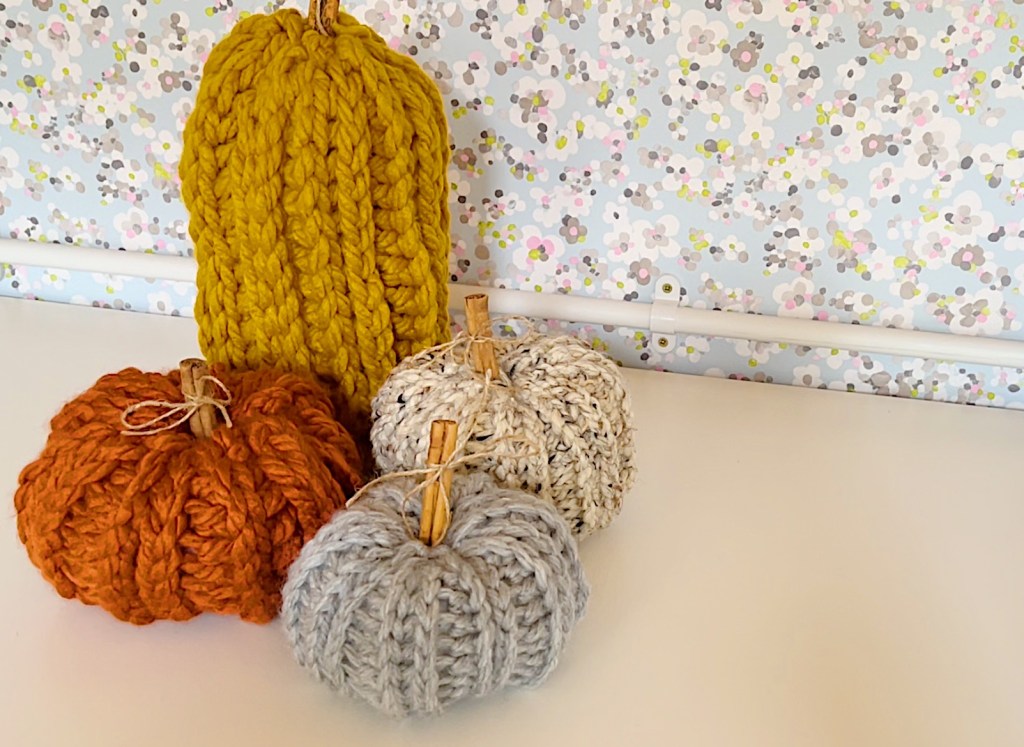
These simple yet beautiful crochet pumpkins are easy and quick to make for both beginners and seasoned crocheter’s alike. As well as the written pattern I have a video tutorial on how to make these pumpkins. You can find the link here –
Please note that this pattern is written in UK terms.

Basic Pumpkin Pattern
Abbreviations –
Ch – chain
SS – Slip stitch
Hdc – Half double crochet
RS – Right side
WS – Wrong side
Crochet Hook Requirements
8mm/Size L crochet hook or size appropriate to yarn.
Materials Needed
Chunky Yarn – I used King Cole Big Value Super Chunky
Polyester stuffing
Darning Needle
Cinnamon Stick
Scissors
Garden twine/string
Special Stitches
HTC 3rd lp – Half Double Crochet in the 3rd Loop
Starting Chain – Begin by chaining 15
Row 1 – starting in the second chain from the hook, hdc into each chain space until you reach the end of the chain. Ch 1, turn.
Row 2 – (RS): *Yo (yarn over), insert hook through the stitch from back to front, push the hook under the third loop of htc, pull up a loop, yo, pull through all three loops on the hook; rep from * until the end of the row, ch1, turn. This pushes the front and back loop of the stitch to the front (RS of work).
Row 3 – (WS): Ch 2, *yo, from the front of work, insert hook under the third loop only, pull up a loop, yo, pull through all three loops on the hook; rep from * across, turn. This pushes the front and back loop of the stitch to the RS of work.
Continue repeating rows 2 and 3 until you have completed 19 rows (you should end on a completed row of row 2).
Fold your finished rectangle so that the WS is facing. Ss through each stitch across too seam. Leave a long tail as we will use this for the bottom closure.
With the long tail and yarn needle, weave through every other row around the bottom of your crochet tube, pull the tail tightly too close but do not trim the tail – we will use this to make the indents on our pumpkin.
Stuff your pumpkin with polyester filling. Join yarn back to the working yarn at the top opening and repeat the closing technique that you used for the bottom. Weave in the ends.
With the long yarn tail from the bottom closure, create indents in every 2nd or 3rd ribbed row between the ridges. Weave the yarn needle down through the stitches, and push the yarn needle through the bottom closure, coming up through the top closure and then pull tight and re-insert your needle into the bottom of the pumpkin. Repeat this step until you have the desired look that you want. Fasten off at the bottom of your pumpkin and weave in your ends.
Add your cinnamon stick to the top opening of your pumpkin and tie some garden twine around the stick. Congratulations! You have made a pumpkin!!!

To make the taller pumpkin you will need a 10mm/size N/P hook. The yarn that I used is Hayfield Bonus Super Chunky in Gilt. The pattern is the same for the regular pumpkin but your starting chain will need to be 25 and the total number of rows in 13.
I hope that you enjoyed this pattern. I would love to see your pumpkins so feel free to tag me on instagram (@lexie_loves_stitching) or post them over on Crochet Beginners Group on Facebook! For more crochet patterns, subscribe to my YouTube channel –
https://www.youtube.com/channel/UChfNx9smipSLjNPe433ap-w
Lots of love
Lexie xxxxx
